-
Type:
Bug
-
Resolution: Duplicate
-
Priority:
 P3
P3
-
Affects Version/s: 8u191
-
Component/s: infrastructure
-
Environment:
Mac mini 10.13/JRE8u191b10
-
x86_64
-
os_x
Test platform: Mac10.13
Test jre: 8u191b10
Test case:ManualTests/Mac/MAC020-001
MAC020-001: Auto Remove dialog is displayed, user choose Remove
* Proving Auto Remove displays to user, user selects Remove, Java removed
Steps:
1. Make sure system is clean:
a. No jre/jdk installed.
2. Install prior JRE in 9 or 10 family.
3. Modify the Info.plist to point to the au.xml in the staged maptest directory.
4. Invoke the Java Control Panel in the System Preferences
5. Click Update Now in the Update Tab
6. Navigate through the new install
a. VERIFY "Java Updates no longer Available" dialog shows up.
7. Click on "Remove" button on Auto Remove dialog
8. Click "Yes" button on Deploy Cache removal dialog.
a. Verify Complete Dialog shows
9. Click on "Close" button to complete the installation procedure.
a. VERIFY Installed JRE is correctly removed
b. VERIFY no errors from /var/log/system.log and backup it.
c. VERIFY ping, includes
<reportsuiteid>suninstallstat
<evar2>10.0.99+buildNumber
<evar5>OS architecture
<evar6>Platform OS
<evar7>auremoval
<evar8>Country of running client installer.
<list1>List variable for describing uninstallation for Java versions, see details from Engineering Specs for AU Java Uninstaller for JRE 9/10#StagingDetails, e.g.
$list1#unjre~0~9.0.4:64;uninstaller~ua100~XX
10.If all verifications true, test is a PASS.
Actually behavior:
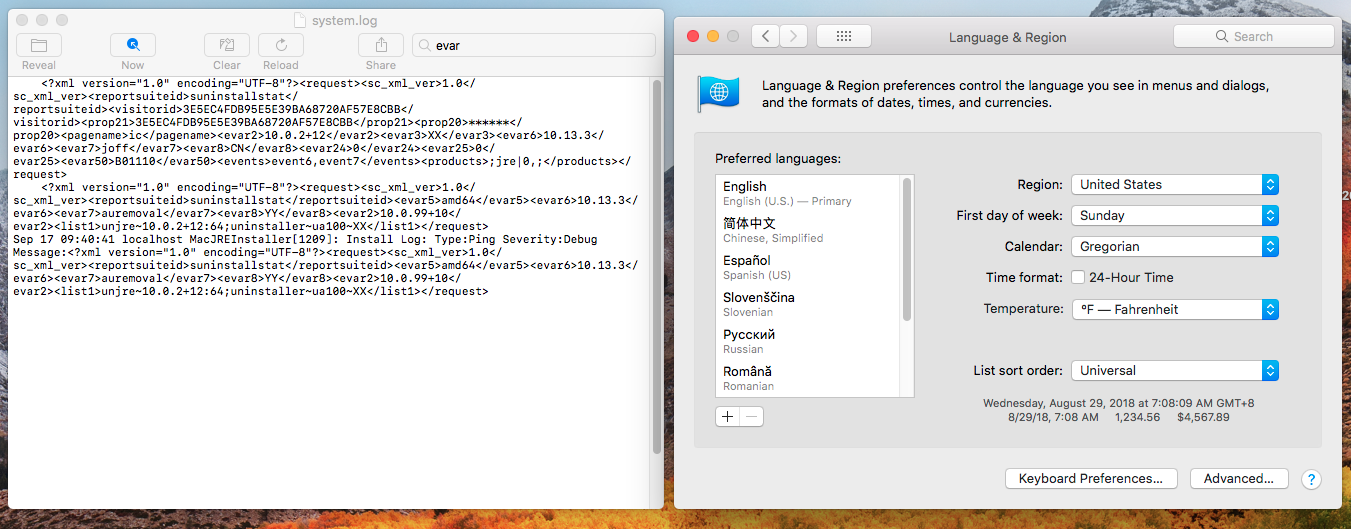
<evar8> displayed as "YY", refer to MAC020-001-system.log and MAC020-001-log-locale.png.
The expected value should be the same as JRE Install ping which is <evar8>CN
Test jre: 8u191b10
Test case:ManualTests/Mac/MAC020-001
MAC020-001: Auto Remove dialog is displayed, user choose Remove
* Proving Auto Remove displays to user, user selects Remove, Java removed
Steps:
1. Make sure system is clean:
a. No jre/jdk installed.
2. Install prior JRE in 9 or 10 family.
3. Modify the Info.plist to point to the au.xml in the staged maptest directory.
4. Invoke the Java Control Panel in the System Preferences
5. Click Update Now in the Update Tab
6. Navigate through the new install
a. VERIFY "Java Updates no longer Available" dialog shows up.
7. Click on "Remove" button on Auto Remove dialog
8. Click "Yes" button on Deploy Cache removal dialog.
a. Verify Complete Dialog shows
9. Click on "Close" button to complete the installation procedure.
a. VERIFY Installed JRE is correctly removed
b. VERIFY no errors from /var/log/system.log and backup it.
c. VERIFY ping, includes
<reportsuiteid>suninstallstat
<evar2>10.0.99+buildNumber
<evar5>OS architecture
<evar6>Platform OS
<evar7>auremoval
<evar8>Country of running client installer.
<list1>List variable for describing uninstallation for Java versions, see details from Engineering Specs for AU Java Uninstaller for JRE 9/10#StagingDetails, e.g.
$list1#unjre~0~9.0.4:64;uninstaller~ua100~XX
10.If all verifications true, test is a PASS.
Actually behavior:
<evar8> displayed as "YY", refer to MAC020-001-system.log and MAC020-001-log-locale.png.
The expected value should be the same as JRE Install ping which is <evar8>CN